How to Build a Secure Project Management Platform with Next.js, Clerk, and Neon
Learn a security-first approach to building web applications by building a secure project management platform with Next.js

This article was first published in the Clerk blog.
Around 30,000 websites and applications are hacked every day*, and the developer is often to blame.
The vast majority of breaches occur due to misconfiguration rather than an actual vulnerability. This could be due to exposed database credentials, unprotected API routes, or data operations without the proper authorization checks just to name a few. It’s important to ensure that your application is configured in a way that prevents attackers from gaining unauthorized access to user data.
In this article, you’ll learn how to build a project management web application while considering security best practices throughout. We’ll cover the process of building Kozi – a collaborative project and knowledge management tool.
Throughout the series, the following features will be implemented:
- Create organizations to invite others to manage projects as a team.
- A rich, collaborative text editor for project and task notes.
- A system to comment on projects, tasks, and notes.
- Automatic RAG functionality for all notes and uploaded files.
- Invite users from outside your organization to collaborate on individual tasks.
- Be notified when events occur on tasks you subscribe to, or you are mentioned in comments or notes.
What makes this a “secure” project management system?
Data security is considered throughout this guide by using the following techniques:
Clerk and the Next.js middleware
Clerk is a user management platform designed to get authentication into your application as quick as possible by providing a complete suite of user management tools as well as drop-in UI components. Behind the scenes, Clerk creates fast expiring tokens upon user sign-in that are sent to your server with each request, where Clerk also verifies the identify of the user.
Clerk integrates with Next.js middleware to ensure every request to the application is evaluated before it reaches its destination. In the section where the middleware is configured, we instruct the middleware to protect any route starting with /app so that only authenticated users may access them. This means that before any functions are executed (on the client or server), the user will need to be authenticated.
Server actions
In this project, server actions are the primary method of interacting with the data in the database. Direct access to the database should always happen on the server and NEVER on the client where tech-savvy users can gain access to the database credentials. Since all functions that access the database are built with server actions, they do not execute client-side.
It’s important to note that calling these server actions should only ever be performed from protected routes. When a Next.js client component executes a server action, an HTTP POST request of form data is submitted to the current path with a unique identifier of the action for Next.js to route the data internally.
This means that calling a server function from an anonymous route might result in anonymous users getting access to the data. This potential vulnerability is addressed in the next section.
Database requests
Protecting access to the functions is only one consideration. Each request will have an accompanying user identifier which can be used to determine the user making that request. This identifier is stored alongside the records the user creates, allowing each request for data to ONLY return the data associated with that user.
When making data modifications, the requesting user ID is cross-referenced with the records being modified or deleted so that one user cannot affect another user’s data.
The combination of protecting access to the routes, being mindful of calling server actions, and cross-referencing database queries with the user making the request ensures that the data within the application is secure and only accessible to those who have access to it.
How to follow along
Kozi is an open-source project, with each article in the series having corresponding start and end branches. This makes it easy to jump in at any point to get hands-on experience with the concepts outlined in each piece, as well as a point of reference if you simply want to see the completed code. Here are links to the specific branches:
You should have a basic understanding of Next.js and React as well.
Launching the project
Once the branch above is cloned, open the project in your editor or terminal and run the following command to start up the application:
npm install
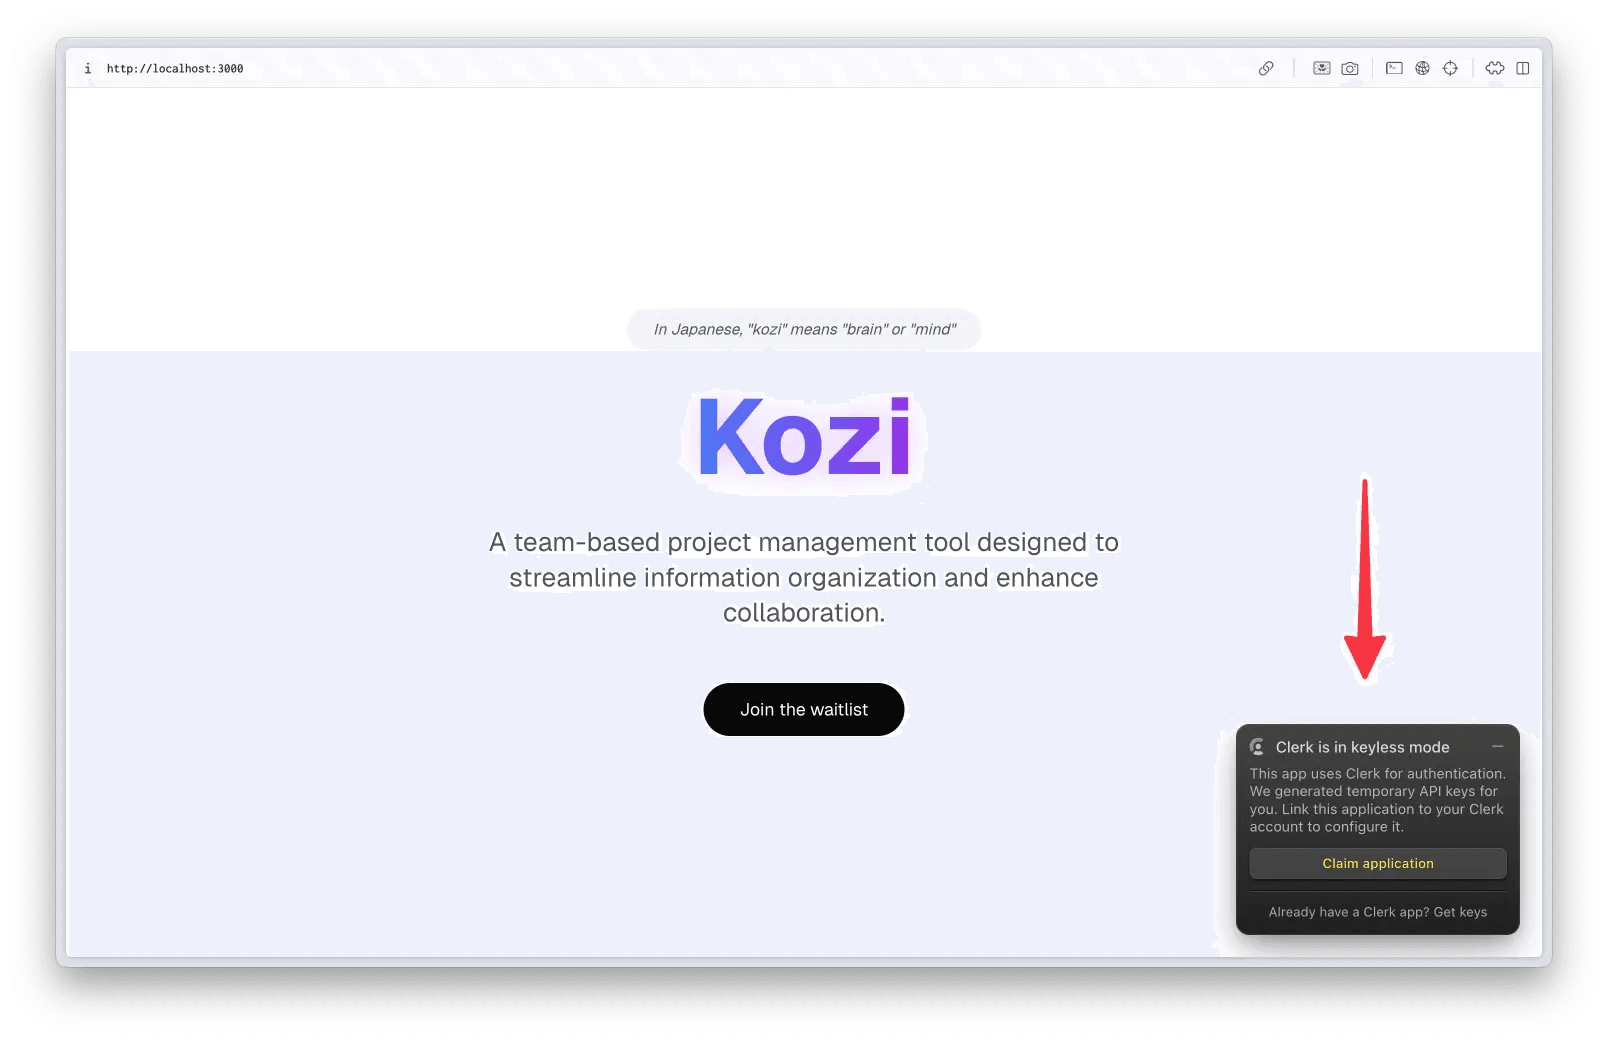
npm run devOpen your browser and navigate to the URL displayed in the terminal to access Kozi. At the bottom right of the screen, you should see Clerk is running in keyless mode. Click the button to claim your keys and associate this instance to your Clerk account. If you don’t have an account, you’ll be prompted to create one.
You are now ready to start building out the core functionality of Kozi!
Setting up the database
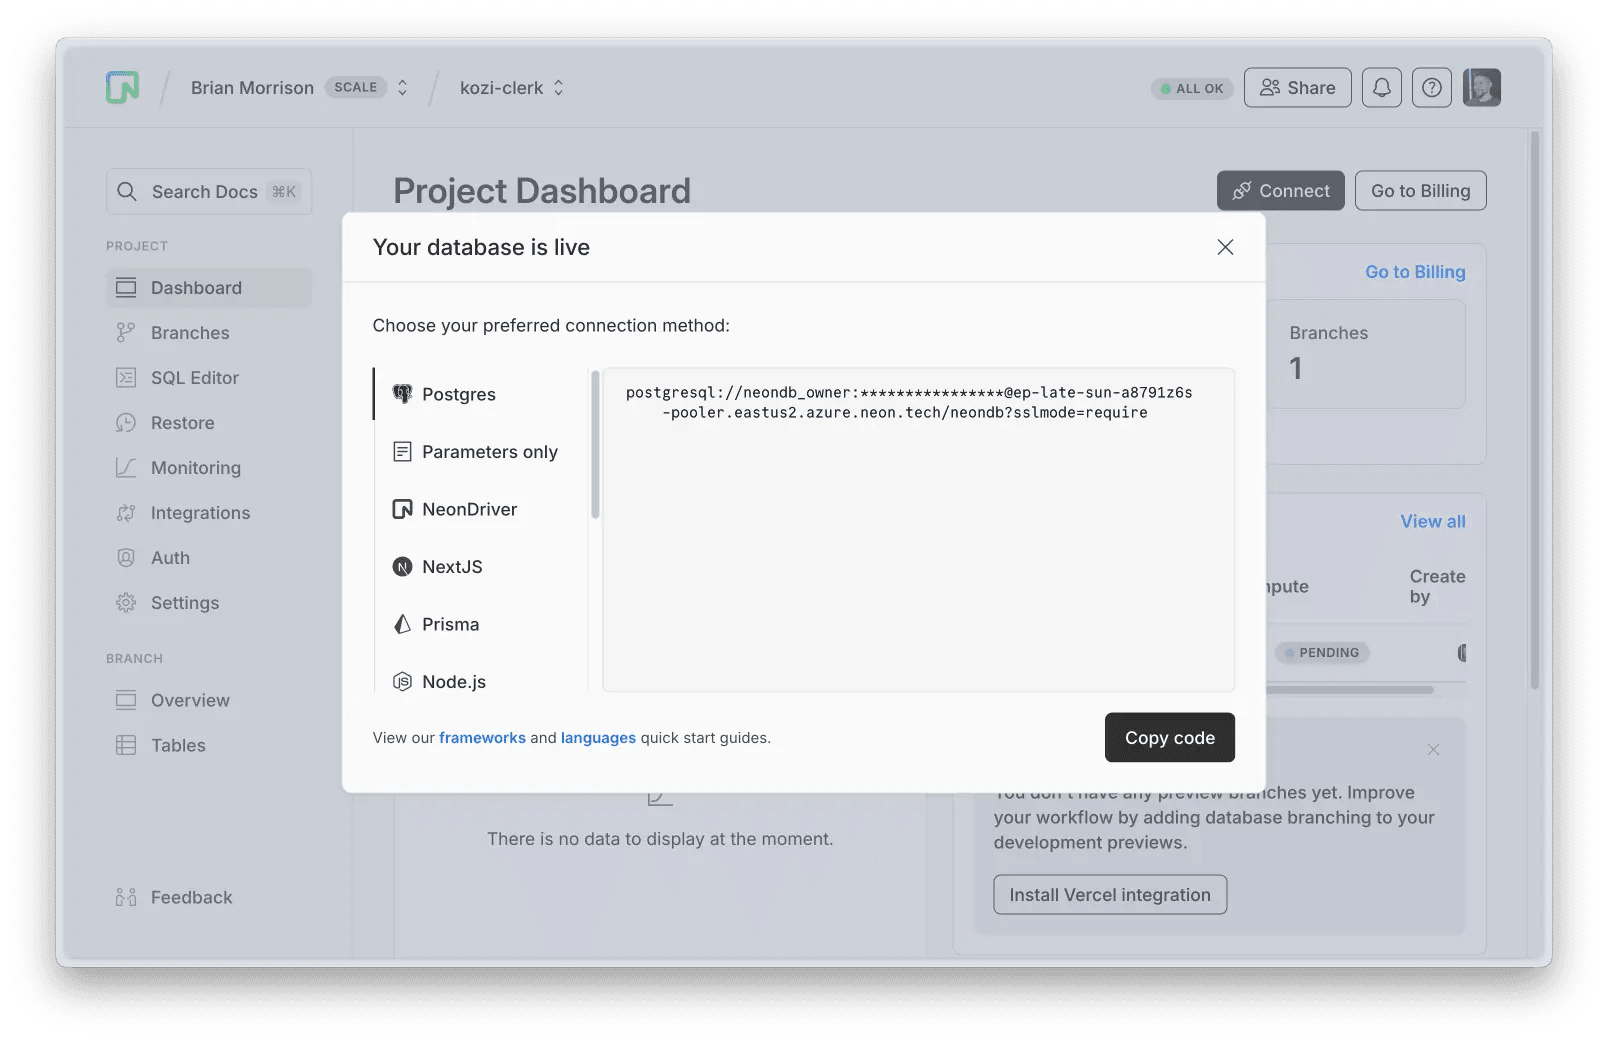
To store structured data, you’ll be using a serverless instance of Postgress provided by Neon. Start by creating a Free Neon account if you don’t have one. Create a new database and copy the connection string as shown below.
Create a new file in your local project named .env.local and paste the following snippet, replacing the placeholder for your specific Neon database connection string.
DATABASE_URL=<your_neon_connection_string>Configuring Prisma
Prisma is used as the ORM to access and manipulate data in the database, as well as apply schema changes to the database as the data needs are updated. Open the project in your IDE and start by creating the schema file at prisma/schema.prisma. Paste in the following code:
generator client {
  provider = "prisma-client-js"
}

datasource db {
  provider = "postgresql"
  url      = env("DATABASE_URL")
}

model Project {
  id          String   @id @default(cuid())
  name        String
  description String?
  owner_id    String
  created_at  DateTime @default(now())
  updated_at  DateTime @updatedAt
  is_archived Boolean @default(false)
}

model Task {
  id          String   @id @default(cuid())
  title       String
  description String?
  owner_id    String
  is_completed Boolean @default(false)
  created_at  DateTime @default(now())
  updated_at  DateTime @updatedAt
  project_id  String?
}
note
owner_id column instead of user_id since this application will be updated to support teams and organizations in a future entry.Next, create the src/lib/db.ts file and paste in the following code which will be used throughout the application to create a connection to the database:
import { PrismaClient } from '@prisma/client'

const globalForPrisma = globalThis as unknown as {
  prisma: PrismaClient | undefined
}

export const prisma = globalForPrisma.prisma ?? new PrismaClient()

if (process.env.NODE_ENV !== 'production') globalForPrisma.prisma = prisma
To sync the schema changes to Neon, run the following command in the terminal:
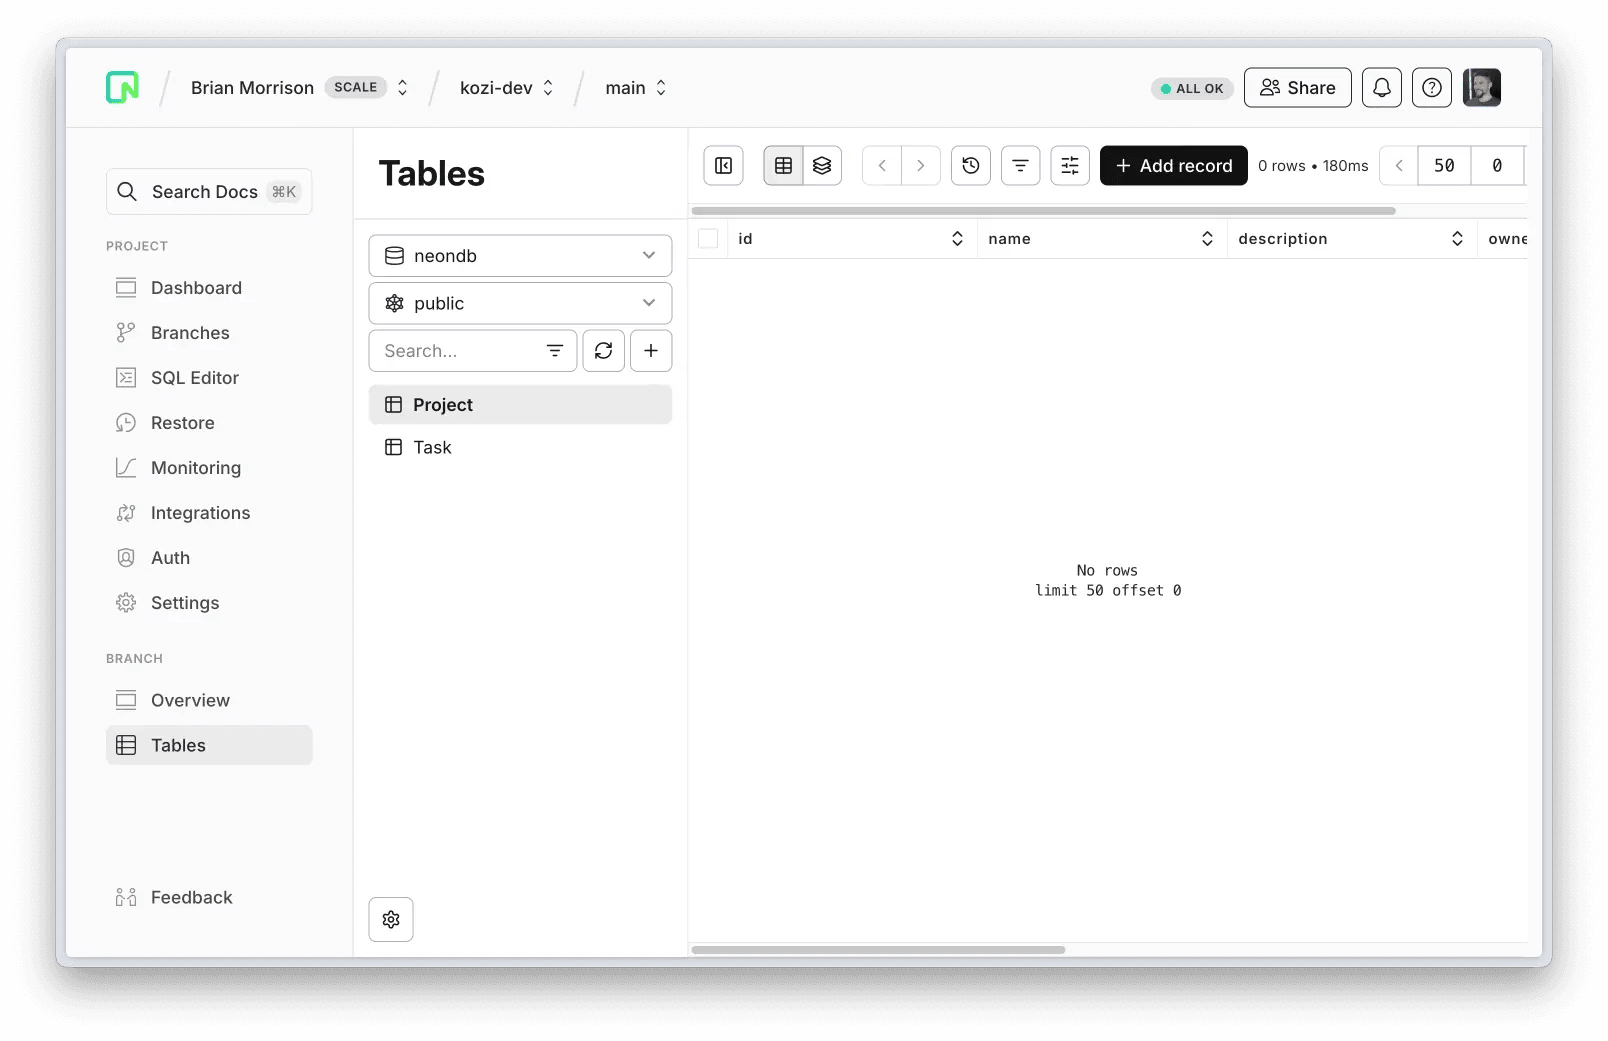
npx prisma db pushIf you open the database in the Neon console and navigate to the Tables menu item, you should see the projectsand tasks tables shown.
Finally, since it is not best practice to use the Prisma client in any client-side components, you’ll want a file to store interfaces so that TypeScript can recognize the structure of your objects when passing them between components.
Create the src/app/app/models.ts file and paste in the following:
export interface Task {
  id: string
  title: string
  description?: string | null
  is_completed: boolean
  created_at: Date
  updated_at: Date
  project_id?: string | null
  owner_id: string
}

export interface Project {
  name: string
  id: string
  description: string | null
  owner_id: string
  created_at: Date
  updated_at: Date
  is_archived: boolean
}
Configure /app as a protected route with Clerk
Clerk’s middleware uses a helper function called createRouteMatcher that lets you define a list of routes to protect. This includes any pages, server actions, or API handlers stored in the matching folders of the project.
All of the core functionality of the application will be stored in the /app route, so update src/middleware.ts to use the createRouteMatcher to protect everything in that folder:
import { clerkMiddleware, createRouteMatcher } from '@clerk/nextjs/server'

const isProtectedRoute = createRouteMatcher(['/app(.*)'])

export default clerkMiddleware(async (auth, req) => {
  if (isProtectedRoute(req)) await auth.protect()
})

export const config = {
  matcher: [
    // Skip Next.js internals and all static files, unless found in search params
    '/((?!_next|[^?]*\.(?:html?|css|js(?!on)|jpe?g|webp|png|gif|svg|ttf|woff2?|ico|csv|docx?|xlsx?|zip|webmanifest)).*)',
    // Always run for API routes
    '/(api|trpc)(.*)',
  ],
}
The /app route will use a different layout from the landing page, which will contain a collapsible sidebar that contains the <UserButton /> (a Clerk UI component that lets users manage their profile and sign out), an inbox for tasks, and a list of projects that tasks can be created in.
Start by creating the src/app/app/components/Sidebar.tsx file to render the elements of the sidebar:
'use client'

import { cn } from '@/lib/utils'
import { ChevronRightIcon, ChevronLeftIcon, InboxIcon } from 'lucide-react'
import React from 'react'
import Link from 'next/link'
import { UserButton } from '@clerk/nextjs'

function Sidebar() {
  const [isCollapsed, setIsCollapsed] = React.useState(false)

  return (
    <div
      className={cn(
        'h-screen border-r border-gray-200 bg-gradient-to-b from-blue-50 via-purple-50/80 to-blue-50 p-4 dark:border-gray-800 dark:from-blue-950/20 dark:via-purple-950/20 dark:to-blue-950/20',
        'transition-all duration-300 ease-in-out',
        isCollapsed ? 'w-16' : 'w-64',
      )}
    >
      <nav className="space-y-2">
        <div className="flex items-center justify-between gap-2">
          <div
            className={cn(
              'transition-all duration-300',
              isCollapsed ? 'w-0 overflow-hidden' : 'w-auto',
            )}
          >
            <UserButton showName />
          </div>
          <button
            onClick={() => setIsCollapsed(!isCollapsed)}
            className="flex-shrink-0 rounded-lg p-1 transition-colors hover:bg-white/75 dark:hover:bg-gray-800/50"
          >
            {isCollapsed ? (
              <ChevronRightIcon className="h-4 w-4" />
            ) : (
              <ChevronLeftIcon className="h-4 w-4" />
            )}
          </button>
        </div>

        <div
          className={cn(
            'transition-all duration-300',
            isCollapsed ? 'w-0 overflow-hidden' : 'w-auto',
          )}
        >
          <Link
            href="/app"
            className="flex items-center gap-2 rounded-lg px-3 py-2 text-sm text-gray-700 transition-colors hover:bg-white/75 dark:text-gray-200 dark:hover:bg-gray-800/50"
          >
            <InboxIcon className="h-4 w-4" />
            <span>Inbox</span>
          </Link>
        </div>
      </nav>
    </div>
  )
}

export default Sidebar
Now create src/app/app/layout.tsx to render the sidebar with the pages in the /app route:
import * as React from 'react'
import Sidebar from './components/Sidebar'

export default function AppLayout({ children }: { children: React.ReactNode }) {
  return (
    <div className="flex">
      <Sidebar />
      <main className="flex-1">{children}</main>
    </div>
  )
}
Next, create src/app/app/page.tsx which is just a simple page that renders some text to make sure the /approute works as expected:
import React from 'react'
import { auth } from '@clerk/nextjs/server'
import { redirect } from 'next/navigation'

export default async function AppHome() {
  const { userId } = await auth()

  if (!userId) {
    return redirect('/sign-in')
  }

  return <div className="flex h-screen">Inbox</div>
}
Open the application in your browser and test out the changes by navigating to the /app which should automatically redirect you to the /sign-in route where you can create an account and make sure /app only works when authenticated.
Working with tasks
At the core of every project is a list of tasks, so now we’ll configure the ability to create and work with tasks in the default Inbox list. Several components will be used to provide the following application structure. The following image shows how these components will be used:
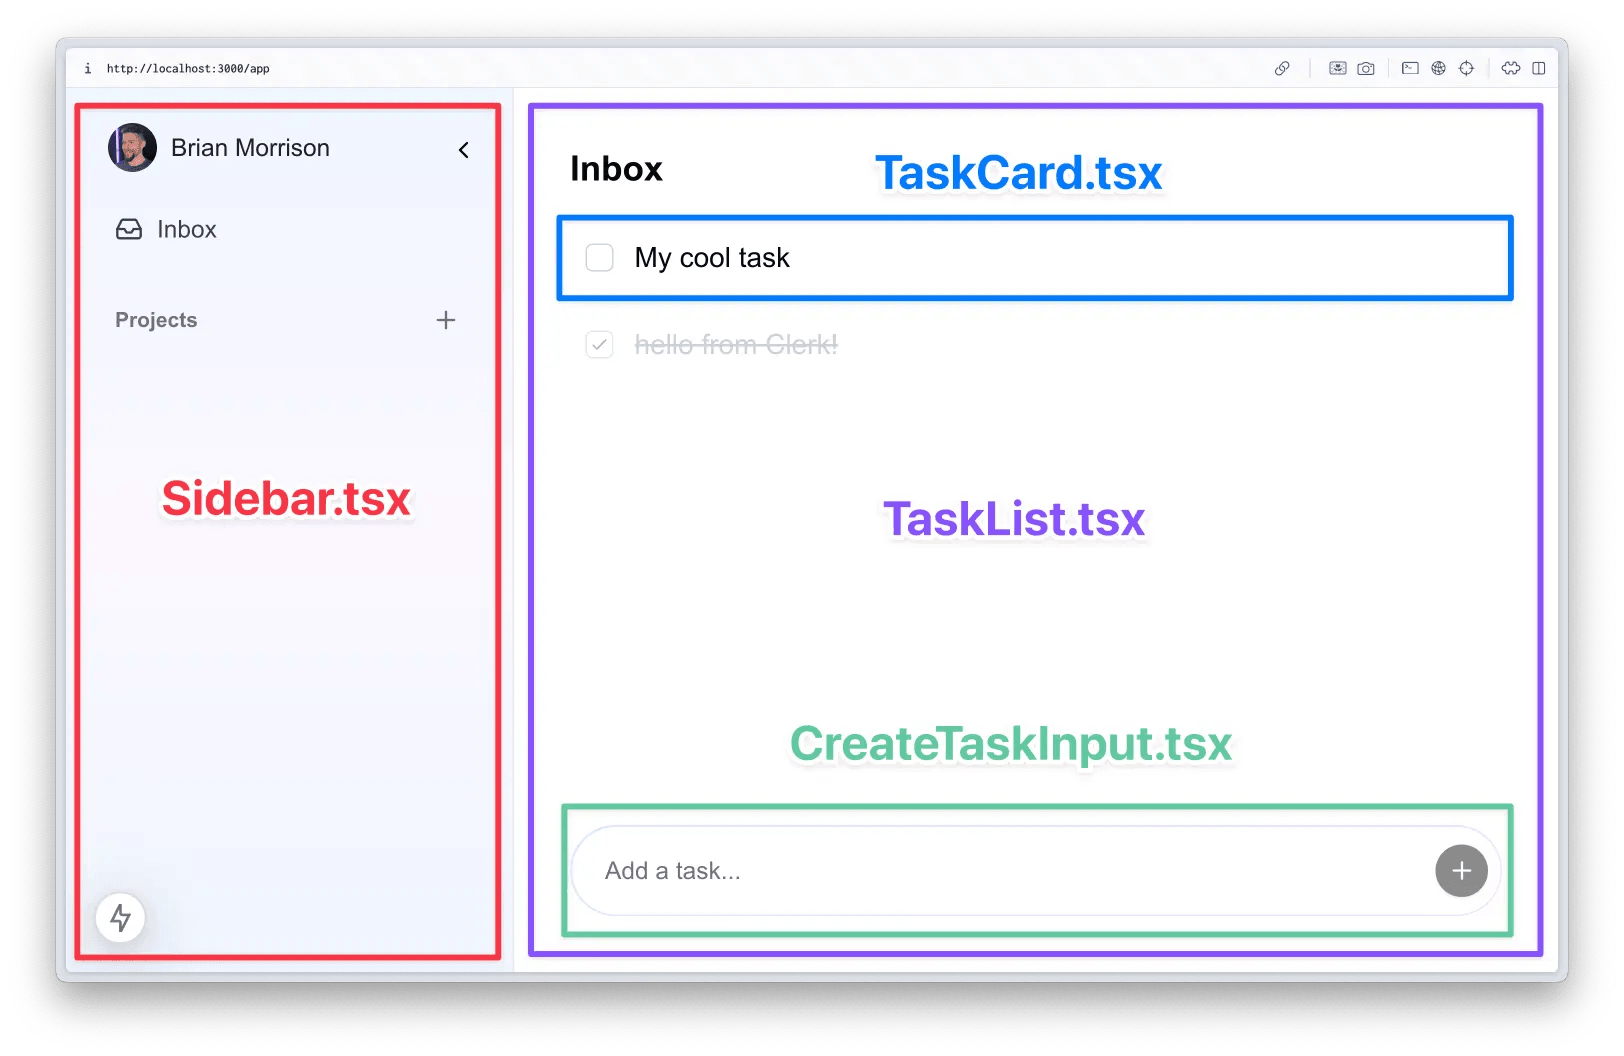
These are all client components so they will need corresponding server actions so they can interact with the database securely. Create the src/app/app/actions.ts file and paste in the following code:
'use server'

import { auth } from '@clerk/nextjs/server'
import { prisma } from '@/lib/db'
import { revalidatePath } from 'next/cache'

export async function createTask(formData: FormData) {
  const { userId } = await auth()
  if (!userId) {
    throw new Error('Unauthorized')
  }

  const title = formData.get('title') as string
  if (!title?.trim()) {
    throw new Error('Title is required')
  }

  await prisma.task.create({
    data: {
      title: title.trim(),
      owner_id: userId,
      project_id: null,
    },
  })

  revalidatePath('/app')
}

export async function toggleTask(taskId: string) {
  const { userId } = await auth()
  if (!userId) {
    throw new Error('Unauthorized')
  }

  const task = await prisma.task.findUnique({
    where: { id: taskId },
  })

  if (!task || task.owner_id !== userId) {
    throw new Error('Task not found or unauthorized')
  }

  await prisma.task.update({
    where: { id: taskId },
    data: { is_completed: !task.is_completed },
  })

  revalidatePath('/app')
}
We’re going to start with the <CreateTaskInput /> component which renders the field where users can create tasks. Create the src/app/app/components/CreateTaskInput.tsx file and paste in the following:
'use client'

import { useState } from 'react'
import { Input } from '@/components/ui/input'
import { Button } from '@/components/ui/button'
import { createTask } from '@/app/app/actions'
import { PlusIcon } from 'lucide-react'

export default function CreateTaskInput() {
  const [title, setTitle] = useState('')
  const [isSubmitting, setIsSubmitting] = useState(false)

  const handleSubmit = async (e: React.FormEvent) => {
    e.preventDefault()

    // Don't create a task if the title is empty
    if (!title.trim()) return

    try {
      setIsSubmitting(true)
      const formData = new FormData()
      formData.append('title', title)
      await createTask(formData)
      setTitle('')
    } finally {
      setIsSubmitting(false)
    }
  }

  return (
    <div className="group relative w-full rounded-full bg-white p-2 transition-shadow duration-200 focus-within:shadow-[0_4px_20px_-2px_rgba(96,165,250,0.3),0_4px_20px_-2px_rgba(192,132,252,0.3)] dark:bg-gray-800">
      <div className="absolute inset-0 rounded-full bg-gradient-to-r from-blue-400/25 to-purple-400/25 transition-opacity duration-200 group-focus-within:from-blue-400 group-focus-within:to-purple-400"></div>
      <div className="absolute inset-[1px] rounded-full bg-white transition-all group-focus-within:inset-[2px] dark:bg-gray-800"></div>
      <div className="relative">
        <form onSubmit={handleSubmit} className="flex w-full items-center gap-2">
          <Input
            type="text"
            value={title}
            onChange={(e) => setTitle(e.target.value)}
            placeholder="Add a task..."
            className="flex-1 border-0 bg-transparent text-gray-900 shadow-none focus-visible:ring-0 focus-visible:ring-offset-0 dark:text-gray-100"
          />
          <Button
            type="submit"
            size="icon"
            disabled={isSubmitting || !title.trim()}
            className="flex !h-[30px] !min-h-0 !w-[30px] items-center justify-center !rounded-full !p-0 !leading-none"
          >
            <PlusIcon className="h-4 w-4" />
          </Button>
        </form>
      </div>
    </div>
  )
}
Next, we’ll move on to <TaskCard />, which will display the name of the task and allow users to toggle it using a checkbox, as is standard in task-centric applications. Create the src/app/app/components/TaskCard.tsx file and paste in the following:
'use client'

import React from 'react'
import { toggleTask } from '../actions'
import { cn } from '@/lib/utils'
import { Task } from '@prisma/client'

interface Props {
  task: Task
}

export default function TaskCard({ task }: Props) {
  return (
    <div
      className={cn(
        'cursor-pointer rounded-lg border border-transparent p-2 transition-colors duration-200 hover:border-gray-100 dark:border-gray-800 dark:hover:bg-gray-800/50',
        task.is_completed && 'opacity-50',
      )}
    >
      <div className="flex items-start justify-between">
        <div className="flex items-start gap-3">
          {/* Checkbox */}
          <button
            onClick={(e) => {
              e.stopPropagation()
              toggleTask(task.id)
            }}
            className="mt-1 flex h-4 w-4 flex-shrink-0 items-center justify-center rounded border border-gray-300 hover:border-gray-400 dark:border-gray-600 dark:hover:border-gray-500"
          >
            {task.is_completed && (
              <svg
                className="h-3 w-3 text-gray-500 dark:text-gray-400"
                fill="none"
                viewBox="0 0 24 24"
                stroke="currentColor"
              >
                <path
                  strokeLinecap="round"
                  strokeLinejoin="round"
                  strokeWidth={2}
                  d="M5 13l4 4L19 7"
                />
              </svg>
            )}
          </button>
          {/* Task details */}
          <div>
            <h3
              className={cn(
                'font-medium',
                task.is_completed && 'text-gray-400 line-through dark:text-gray-500',
              )}
            >
              {task.title}
            </h3>

            {task.description && (
              <p
                className={cn(
                  'mt-1 text-sm text-gray-500 dark:text-gray-400',
                  task.is_completed && 'line-through opacity-75',
                )}
              >
                {task.description}
              </p>
            )}
          </div>
        </div>
      </div>
    </div>
  )
}
Finally, create the <TaskList /> component to render the list of tasks and the input to create new ones. Create the src/app/app/components/TaskList.tsx file and paste in the following:
'use client'

import React from 'react'
import TaskCard from './TaskCard'
import CreateTaskInput from './CreateTaskInput'
import { Task } from '@prisma/client'

interface Props {
  title: string
  tasks: Task[]
}

export default function TaskList({ title, tasks }: Props) {
  return (
    <div className="flex h-screen w-full max-w-2xl flex-col gap-4 p-8">
      <h1 className="text-lg font-semibold md:text-xl">{title}</h1>

      <div className="w-full flex-1 rounded-xl">
        <div className="space-y-2">
          {tasks.length === 0 ? (
            <p className="text-gray-500 dark:text-gray-400">No tasks</p>
          ) : (
            tasks.map((task) => <TaskCard key={task.id} task={task} />)
          )}
        </div>
      </div>
      <div className="w-full">
        <CreateTaskInput />
      </div>
    </div>
  )
}
With all of our components created, update the src/app/app/page.tsx to match the following code which uses the components created above, as well as queries the database for all tasks on load:
import React from 'react'
import { auth } from '@clerk/nextjs/server'
import { redirect } from 'next/navigation'
import { prisma } from '@/lib/db'
import TaskList from './components/TaskList'

export default async function AppHome() {
  const { userId } = await auth()

  if (!userId) {
    return redirect('/sign-in')
  }

  // Get the user's inbox tasks
  const tasks = await prisma.task.findMany({
    where: {
      owner_id: userId,
      project_id: null,
    },
    orderBy: {
      created_at: 'desc',
    },
  })

  return (
    <div className="flex h-screen">
      <TaskList title="Inbox" tasks={tasks} />
    </div>
  )
}
If you access the application again, you can now create tasks in your inbox and complete them.
Editing and deleting tasks
Now that you can create tasks, the next step is to set up a modal so clicking the task (outside of the checkbox) will display the modal and allow you to change the name of the task and set a description if needed.
As a design decision, this modal does not include a save button but rather debounces any edits for 1 second to create an experience where users can quickly save values and avoid another click. The modal will also create a menu in the header which allows you to delete the task.
Start by appending the following code to src/app/app/actions.ts:
export async function updateTask(formData: FormData) {
  const { userId } = await auth()
  if (!userId) {
    throw new Error('Unauthorized')
  }

  const id = formData.get('id') as string
  const title = formData.get('title') as string
  const description = formData.get('description') as string

  if (!id || !title?.trim()) {
    throw new Error('Invalid input')
  }

  const task = await prisma.task.findUnique({
    where: { id },
  })

  if (!task || task.owner_id !== userId) {
    throw new Error('Task not found or unauthorized')
  }

  await prisma.task.update({
    where: { id },
    data: {
      title: title.trim(),
      description: description?.trim() || null,
    },
  })

  revalidatePath('/app')
}

export async function deleteTask(taskId: string) {
  const { userId } = await auth()
  if (!userId) {
    throw new Error('Unauthorized')
  }

  // Delete the task
  await prisma.task.delete({
    where: {
      id: taskId,
      owner_id: userId, // Ensure the task belongs to the user
    },
  })

  revalidatePath('/app')
}
Next, create the src/app/app/components/EditTaskModal.tsx and paste in the following:
'use client'

import { useEffect, useState } from 'react'
import { useDebouncedCallback } from 'use-debounce'
import { Dialog, DialogContent, DialogHeader, DialogTitle } from '@/components/ui/dialog'
import { Textarea } from '@/components/ui/textarea'
import { useRouter } from 'next/navigation'
import { updateTask, toggleTask, deleteTask } from '../actions'
import { Folder, MoreVertical, Trash2, X } from 'lucide-react'
import { Button } from '@/components/ui/button'
import {
  DropdownMenu,
  DropdownMenuContent,
  DropdownMenuItem,
  DropdownMenuTrigger,
} from '@/components/ui/dropdown-menu'
import {
  AlertDialog,
  AlertDialogAction,
  AlertDialogCancel,
  AlertDialogContent,
  AlertDialogDescription,
  AlertDialogFooter,
  AlertDialogHeader,
  AlertDialogTitle,
} from '@/components/ui/alert-dialog'
import { Task } from '../models'

interface Props {
  task: Task
  open: boolean
  onOpenChange: (open: boolean) => void
  projectName?: string
}

export default function EditTaskModal({
  task: initialTask,
  open,
  onOpenChange,
  projectName,
}: Props) {
  const [task, setTask] = useState(initialTask)
  const [title, setTitle] = useState(task.title)
  const [description, setDescription] = useState(task.description || '')
  const [isSubmitting, setIsSubmitting] = useState(false)
  const [showDeleteConfirm, setShowDeleteConfirm] = useState(false)
  const router = useRouter()

  // Reset form when modal opens
  useEffect(() => {
    if (open) {
      setTask(initialTask)
      setTitle(initialTask.title)
      setDescription(initialTask.description || '')
    }
  }, [open, initialTask])

  const saveChanges = useDebouncedCallback(async () => {
    if (!title.trim()) return

    try {
      setIsSubmitting(true)
      const formData = new FormData()
      formData.append('id', task.id)
      formData.append('title', title.trim())
      formData.append('description', description.trim())
      await updateTask(formData)
      router.refresh()
    } finally {
      setIsSubmitting(false)
    }
  }, 1000)

  async function onToggleCompleted() {
    const newIsCompleted = !task.is_completed
    setTask((prev) => ({ ...prev, is_completed: newIsCompleted }))
    try {
      await toggleTask(task.id)
    } catch (error) {
      // Revert on error
      setTask((prev) => ({ ...prev, is_completed: !newIsCompleted }))
    }
  }

  function titleRef(el: HTMLTextAreaElement | null) {
    if (el) {
      el.style.height = '2.5rem' // Set initial height
      const scrollHeight = el.scrollHeight
      const minHeight = 40 // 2.5rem in pixels
      el.style.height = `${Math.max(scrollHeight, minHeight)}px`
    }
  }

  function onTitleChange(e: React.ChangeEvent<HTMLTextAreaElement>) {
    setTitle(e.target.value)
    saveChanges()

    // Auto-adjust height after value changes
    const el = e.target
    el.style.height = '2.5rem' // Reset to minimum height
    const scrollHeight = el.scrollHeight
    const minHeight = 40 // 2.5rem in pixels
    el.style.height = `${Math.max(scrollHeight, minHeight)}px`
  }

  function onDescriptionChange(e: React.ChangeEvent<HTMLTextAreaElement>) {
    setDescription(e.target.value)
    saveChanges()
  }

  async function handleDelete() {
    try {
      await deleteTask(task.id)
      onOpenChange(false)
      router.refresh()
    } catch (error) {
      console.error('Failed to delete task:', error)
    }
  }

  return (
    <>
      {/*  The edit task modal */}
      <Dialog open={open} onOpenChange={onOpenChange}>
        <DialogContent className="flex h-[80vh] flex-col gap-0 p-0 [&>button]:hidden">
          <DialogHeader className="border-b border-gray-200 p-3">
            <div className="flex items-center justify-between">
              <DialogTitle className="flex items-center gap-2 text-sm">
                <Folder size={14} /> {projectName ?? 'Inbox'}
              </DialogTitle>
              <div className="flex items-center gap-1">
                <DropdownMenu>
                  <DropdownMenuTrigger asChild>
                    <Button variant="ghost" size="icon" className="h-8 w-8">
                      <MoreVertical className="h-4 w-4" />
                    </Button>
                  </DropdownMenuTrigger>
                  <DropdownMenuContent align="end">
                    <DropdownMenuItem
                      onClick={() => setShowDeleteConfirm(true)}
                      className="text-red-600 dark:text-red-400"
                    >
                      <Trash2 className="mr-2 h-4 w-4" />
                      Delete Task
                    </DropdownMenuItem>
                  </DropdownMenuContent>
                </DropdownMenu>
                <Button
                  variant="ghost"
                  size="icon"
                  className="h-8 w-8"
                  onClick={() => onOpenChange(false)}
                >
                  <X className="h-4 w-4" />
                </Button>
              </div>
            </div>
          </DialogHeader>
          <div className="flex flex-1 flex-col">
            <div className="flex items-start border-b border-gray-200 p-3">
              <div className="pt-[0.7rem]">
                <input
                  type="checkbox"
                  checked={task.is_completed}
                  onChange={onToggleCompleted}
                  className="text-primary h-4 w-4 rounded border-gray-300 hover:cursor-pointer"
                />
              </div>

              <Textarea
                ref={titleRef}
                value={title}
                onChange={onTitleChange}
                placeholder="Task title"
                disabled={isSubmitting}
                className="min-h-0 flex-1 resize-none overflow-hidden border-none bg-transparent font-semibold leading-normal shadow-none outline-none ring-0 transition-colors hover:bg-gray-50 focus:border focus:border-gray-200 focus:shadow-none focus:ring-0 dark:hover:bg-gray-800/50 dark:focus:border-gray-800 md:text-base"
                onKeyDown={(e) => {
                  if (e.key === 'Enter' && !e.shiftKey) {
                    e.preventDefault()
                  }
                }}
              />
            </div>

            <div className="flex-1">
              <Textarea
                value={description}
                onChange={onDescriptionChange}
                placeholder="Add a description..."
                disabled={isSubmitting}
                className="h-full resize-y rounded-none border-0 p-3 shadow-none focus:outline-none focus:ring-0 focus-visible:outline-none focus-visible:ring-0"
                onKeyDown={(e) => {
                  if (e.key === 'Enter') {
                    // Allow line breaks
                    e.stopPropagation()
                  }
                }}
              />
            </div>
          </div>
          <div className="flex justify-between border-t border-gray-200 p-2 text-[10px] text-gray-400 dark:text-gray-500">
            <div>
              Created {new Date(task.created_at).toLocaleDateString()} at{' '}
              {new Date(task.created_at).toLocaleTimeString()}
            </div>
            <div>
              Updated {new Date(task.updated_at).toLocaleDateString()} at{' '}
              {new Date(task.updated_at).toLocaleTimeString()}
            </div>
          </div>
        </DialogContent>
      </Dialog>

      {/*  The alert dialog for deleting a task */}
      <AlertDialog open={showDeleteConfirm} onOpenChange={setShowDeleteConfirm}>
        <AlertDialogContent>
          <AlertDialogHeader>
            <AlertDialogTitle>Are you sure?</AlertDialogTitle>
            <AlertDialogDescription>
              This action cannot be undone. This will permanently delete the task.
            </AlertDialogDescription>
          </AlertDialogHeader>
          <AlertDialogFooter>
            <AlertDialogCancel>Cancel</AlertDialogCancel>
            <AlertDialogAction onClick={handleDelete} className="bg-red-500 hover:bg-red-600">
              Delete
            </AlertDialogAction>
          </AlertDialogFooter>
        </AlertDialogContent>
      </AlertDialog>
    </>
  )
}
Finally, update src/app/app/TaskCard.tsx to include the EditTaskModal component and handle user click events:
'use client'

import React from 'react'
import { toggleTask } from '../actions'
import { cn } from '@/lib/utils'
import { Task } from '@prisma/client'
import EditTaskModal from './EditTaskModal'

interface Props {
  task: Task
}

export default function TaskCard({ task }: Props) {
  const [isModalOpen, setIsModalOpen] = React.useState(false)

  const handleClick = (e: React.MouseEvent) => {
    const target = e.target as HTMLElement
    // Don't open modal if clicking the checkbox
    if (!target.closest('button')) {
      setIsModalOpen(true)
    }
  }

  return (
    <>
      <div
        onClick={handleClick}
        className={cn(
          'cursor-pointer rounded-lg border border-transparent p-2 transition-colors duration-200 hover:border-gray-100 dark:border-gray-800 dark:hover:bg-gray-800/50',
          task.is_completed && 'opacity-50',
        )}
      >
        <div className="flex items-start justify-between">
          <div className="flex items-start gap-3">
            {/* Checkbox */}
            <button
              onClick={(e) => {
                e.stopPropagation()
                toggleTask(task.id)
              }}
              className="mt-1 flex h-4 w-4 flex-shrink-0 items-center justify-center rounded border border-gray-300 hover:border-gray-400 dark:border-gray-600 dark:hover:border-gray-500"
            >
              {task.is_completed && (
                <svg
                  className="h-3 w-3 text-gray-500 dark:text-gray-400"
                  fill="none"
                  viewBox="0 0 24 24"
                  stroke="currentColor"
                >
                  <path
                    strokeLinecap="round"
                    strokeLinejoin="round"
                    strokeWidth={2}
                    d="M5 13l4 4L19 7"
                  />
                </svg>
              )}
            </button>
            {/* Task details */}
            <div>
              <h3
                className={cn(
                  'font-medium',
                  task.is_completed && 'text-gray-400 line-through dark:text-gray-500',
                )}
              >
                {task.title}
              </h3>

              {task.description && (
                <p
                  className={cn(
                    'mt-1 text-sm text-gray-500 dark:text-gray-400',
                    task.is_completed && 'line-through opacity-75',
                  )}
                >
                  {task.description}
                </p>
              )}
            </div>
          </div>
        </div>
      </div>

      <EditTaskModal task={task} open={isModalOpen} onOpenChange={setIsModalOpen} />
    </>
  )
}
Now you can click anywhere outside of the checkbox of a task to open the modal to edit the task name and description or delete the task from the database.
Working with projects
Users of Kozi can create projects to organize their tasks into categorized lists. Projects will be listed in the sidebar in their own section from the Inbox. When selected, the user will navigate to the /app/projects/[_id] route to see the tasks for that project. To start implementing this, update src/app/app/actions.ts to match the following:
'use server'

import { auth } from '@clerk/nextjs/server'
import { prisma } from '@/lib/db'
import { revalidatePath } from 'next/cache'

export async function createTask(formData: FormData) {
  const { userId } = await auth()
  if (!userId) {
    throw new Error('Unauthorized')
  }

  const title = formData.get('title') as string
  if (!title?.trim()) {
    throw new Error('Title is required')
  }

  const project_id = formData.get('project_id') as string | null

  await prisma.task.create({
    data: {
      title: title.trim(),
      owner_id: userId,
      project_id: project_id || null,
    },
  })

  revalidatePath('/app')
}

export async function toggleTask(taskId: string) {
  const { userId } = await auth()
  if (!userId) {
    throw new Error('Unauthorized')
  }

  const task = await prisma.task.findUnique({
    where: { id: taskId },
  })

  if (!task || task.owner_id !== userId) {
    throw new Error('Task not found or unauthorized')
  }

  await prisma.task.update({
    where: { id: taskId },
    data: { is_completed: !task.is_completed },
  })

  revalidatePath('/app')
}

export async function updateTask(formData: FormData) {
  const { userId } = await auth()
  if (!userId) {
    throw new Error('Unauthorized')
  }

  const id = formData.get('id') as string
  const title = formData.get('title') as string
  const description = formData.get('description') as string

  if (!id || !title?.trim()) {
    throw new Error('Invalid input')
  }

  const task = await prisma.task.findUnique({
    where: { id },
  })

  if (!task || task.owner_id !== userId) {
    throw new Error('Task not found or unauthorized')
  }

  await prisma.task.update({
    where: { id },
    data: {
      title: title.trim(),
      description: description?.trim() || null,
    },
  })

  revalidatePath('/app')
}

export async function deleteTask(taskId: string) {
  const { userId } = await auth()
  if (!userId) {
    throw new Error('Unauthorized')
  }

  // Delete the task
  await prisma.task.delete({
    where: {
      id: taskId,
      owner_id: userId, // Ensure the task belongs to the user
    },
  })

  revalidatePath('/app')
}

export async function getProjects() {
  const { userId } = await auth()
  if (!userId) {
    throw new Error('Unauthorized')
  }

  return prisma.project.findMany({
    where: {
      owner_id: userId,
    },
    orderBy: {
      created_at: 'asc',
    },
  })
}

export async function createProject(formData: FormData) {
  const { userId } = await auth()
  if (!userId) {
    throw new Error('Unauthorized')
  }

  const name = formData.get('name') as string
  if (!name?.trim()) {
    throw new Error('Project name is required')
  }

  const project = await prisma.project.create({
    data: {
      name: name.trim(),
      owner_id: userId,
    },
  })

  revalidatePath('/app')
  return project
}
Next, you’ll need to create the page to render the tasks for a given project. Create src/app/app/projects/[_id]/page.tsx and paste in the following:
import React from 'react'
import { auth } from '@clerk/nextjs/server'
import { prisma } from '@/lib/db'
import { notFound, redirect } from 'next/navigation'
import TaskList from '../../components/TaskList'

interface ProjectPageProps {
  params: Promise<{
    _id: string
  }>
}

export default async function Project({ params }: ProjectPageProps) {
  const { userId } = await auth()

  // If the user is not logged in, redirect to the sign-in page
  if (!userId) {
    return redirect('/sign-in')
  }

  const { _id } = await params
  const project = await prisma.project.findUnique({
    where: {
      id: _id,
    },
  })

  // Check if the project exists and belongs to the user
  if (!project || project.owner_id !== userId) {
    notFound()
  }

  // Get the project tasks
  const tasks = await prisma.task.findMany({
    where: {
      project_id: _id,
      owner_id: userId,
    },
    orderBy: {
      created_at: 'desc',
    },
  })

  return (
    <div className="flex h-screen">
      <TaskList title={project.name} tasks={tasks} projectId={project.id} />
    </div>
  )
}
Notice in the TaskList component that we’ve added projectId to the list of props. This is so that the currently active project ID can be passed to CreateTaskInput so that when a task is created, it knows what project to associate it with. Let’s update those two components now.
Modify app/src/src/components/CreateTaskInput.tsx to match the following:
'use client'

import { useState } from 'react'
import { Input } from '@/components/ui/input'
import { Button } from '@/components/ui/button'
import { createTask } from '@/app/app/actions'
import { PlusIcon } from 'lucide-react'

interface Props {
  projectId?: string
}

export default function CreateTaskInput({ projectId }: Props) {
  const [title, setTitle] = useState('')
  const [isSubmitting, setIsSubmitting] = useState(false)

  const handleSubmit = async (e: React.FormEvent) => {
    e.preventDefault()

    // Don't create a task if the title is empty
    if (!title.trim()) return

    try {
      setIsSubmitting(true)
      const formData = new FormData()
      formData.append('title', title)
      if (projectId) {
        formData.append('project_id', projectId)
      }
      await createTask(formData)
      setTitle('')
    } finally {
      setIsSubmitting(false)
    }
  }

  return (
    <div className="group relative w-full rounded-full bg-white p-2 transition-shadow duration-200 focus-within:shadow-[0_4px_20px_-2px_rgba(96,165,250,0.3),0_4px_20px_-2px_rgba(192,132,252,0.3)] dark:bg-gray-800">
      <div className="absolute inset-0 rounded-full bg-gradient-to-r from-blue-400/25 to-purple-400/25 transition-opacity duration-200 group-focus-within:from-blue-400 group-focus-within:to-purple-400"></div>
      <div className="absolute inset-[1px] rounded-full bg-white transition-all group-focus-within:inset-[2px] dark:bg-gray-800"></div>
      <div className="relative">
        <form onSubmit={handleSubmit} className="flex w-full items-center gap-2">
          <Input
            type="text"
            value={title}
            onChange={(e) => setTitle(e.target.value)}
            placeholder="Add a task..."
            className="flex-1 border-0 bg-transparent text-gray-900 shadow-none focus-visible:ring-0 focus-visible:ring-offset-0 dark:text-gray-100"
          />
          <Button
            type="submit"
            size="icon"
            disabled={isSubmitting || !title.trim()}
            className="flex !h-[30px] !min-h-0 !w-[30px] items-center justify-center !rounded-full !p-0 !leading-none"
          >
            <PlusIcon className="h-4 w-4" />
          </Button>
        </form>
      </div>
    </div>
  )
}
Next, update the TaskCard component to pass the name of the selected project through to the EditTaskModal to provide a quick reference to what project the task is part of.
Edit src/app/app/components/TaskCard.tsx to match the following:
'use client';

import React from 'react';
import { toggleTask } from '../actions';
import EditTaskModal from './EditTaskModal';
import { cn } from '@/lib/utils';
import { Task } from '@prisma/client';

interface Props {
  task: Task;
  projectName: string;
}

export default function TaskCard({ task, projectName }: Props) {
  const [isModalOpen, setIsModalOpen] = React.useState(false);

  const handleClick = (e: React.MouseEvent) => {
    const target = e.target as HTMLElement;
    // Don't open modal if clicking the checkbox
    if (!target.closest('button')) {
      setIsModalOpen(true);
    }
  };

  return (
    <>
      <div
        onClick={handleClick}
        className={cn(
          "p-2 rounded-lg border border-transparent hover:border-gray-100 dark:border-gray-800 dark:hover:bg-gray-800/50 cursor-pointer transition-colors duration-200",
          task.is_completed && "opacity-50"
        )}
      >
        <div className="flex items-start justify-between">
          <div className="flex items-start gap-3">
            {/* Checkbox */}
            <button
              onClick={(e) => {
                e.stopPropagation();
                toggleTask(task.id);
              }}
              className="mt-1 h-4 w-4 flex-shrink-0 rounded border border-gray-300 dark:border-gray-600 flex items-center justify-center hover:border-gray-400 dark:hover:border-gray-500"
            >
              {task.is_completed && (
                <svg className="h-3 w-3 text-gray-500 dark:text-gray-400" fill="none" viewBox="0 0 24 24" stroke="currentColor">
                  <path strokeLinecap="round" strokeLinejoin="round" strokeWidth={2} d="M5 13l4 4L19 7" />
                </svg>
              )}
            </button>
            {/* Task details */}
            <div>
              <h3 className={cn(
                "font-medium",
                task.is_completed && "line-through text-gray-400 dark:text-gray-500"
              )}>{task.title}</h3>

              {task.description && (
                <p className={cn(
                  "text-sm text-gray-500 dark:text-gray-400 mt-1",
                  task.is_completed && "line-through opacity-75"
                )}>
                  {task.description}
                </p>
              )}
            </div>
          </div>
        </div>
      </div>

      <EditTaskModal
        task={task}
        open={isModalOpen}
        onOpenChange={setIsModalOpen}
        projectName={projectName}
      />
    </>
  );
}
Now update src/app/app/components/TaskList.tsx to include the projectId prop and pass it to CreateTaskInput:
'use client';

import TaskCard from './TaskCard';
import CreateTaskInput from './CreateTaskInput';
import { Task } from '@prisma/client';

interface Props {
  title: string;
  tasks: Task[];
  projectId?: string;
}

export default function TaskList({ title, tasks, projectId }: Props) {
  return (
    <div className="h-screen flex flex-col w-full max-w-2xl p-8 gap-4">
      <h1 className="text-lg md:text-xl font-semibold">{title}</h1>

      <div className="w-full flex-1 rounded-xl">
        <div className="space-y-2">
          {tasks.length === 0 ? (
            <p className="text-gray-500 dark:text-gray-400">No tasks</p>
          ) : (
            tasks.map((task) => (
              <TaskCard key={task.id} task={task} projectName={title} />
            ))
          )}
        </div>
      </div>
      <div className='w-full'>
        <CreateTaskInput projectId={projectId} />
      </div>
    </div>
  );
}
In order to access project data in real time from multiple client-side components, we’re going to use a Zustand store to keep things synchronized throughout the application. Using a store will allow projects to be edited and deleted without having to refresh the page. This will become more evident in the subsequent sections.
Create src/lib/store.ts and paste in the following:
import { Project } from '@/app/app/models'
import { create } from 'zustand'

interface ProjectStore {
  projects: Project[]
  setProjects: (projects: Project[]) => void
  updateProject: (id: string, updates: Partial<Project>) => void
}

export const useProjectStore = create<ProjectStore>((set) => ({
  projects: [],
  setProjects: (projects) => set({ projects }),
  updateProject: (id, updates) =>
    set((state) => ({
      projects: state.projects.map((project) =>
        project.id === id ? { ...project, ...updates } : project,
      ),
    })),
}))
The projects will be listed in the sidebar, alongside a button to create new projects as needed. Each element in the list will be its own component. Create src/app/app/components/ProjectLink.tsx and paste in the following:
'use client'

import React from 'react'
import Link from 'next/link'
import { FolderIcon } from 'lucide-react'
import { cn } from '@/lib/utils'
import { Project } from '../models'

interface Props {
  project: Project
  isCollapsed?: boolean
}

export default function ProjectLink({ project, isCollapsed }: Props) {
  return (
    <div className="group relative">
      <div className="flex items-center rounded-lg px-3 py-2 text-sm text-gray-700 transition-colors group-hover:bg-white/75 dark:text-gray-200 dark:group-hover:bg-gray-800/50">
        <Link href={`/app/projects/${project.id}`} className="flex flex-1 items-center gap-2">
          <FolderIcon className="h-4 w-4 flex-shrink-0" />
          <span className={cn('transition-opacity duration-200', isCollapsed && 'opacity-0')}>
            {project.name}
          </span>
        </Link>
      </div>
    </div>
  )
}
Let’s create a component that will live in the sidebar that opens a modal to create a new project. Create the src/app/app/components/CreateProjectButton.tsx file and paste in the following:
'use client'

import { useState, useRef } from 'react'
import {
  Dialog,
  DialogContent,
  DialogHeader,
  DialogTitle,
  DialogTrigger,
} from '@/components/ui/dialog'
import { Button } from '@/components/ui/button'
import { Input } from '@/components/ui/input'
import { createProject } from '@/app/app/actions'
import { useFormStatus } from 'react-dom'
import { PlusIcon } from 'lucide-react'
import { useProjectStore } from '@/lib/store'

function SubmitButton() {
  const { pending } = useFormStatus()
  return (
    <Button type="submit" disabled={pending}>
      Create Project
    </Button>
  )
}

export default function CreateProjectButton() {
  const [isOpen, setIsOpen] = useState(false)
  const formRef = useRef<HTMLFormElement>(null)
  const { projects, setProjects } = useProjectStore()

  async function onSubmit(formData: FormData) {
    try {
      const project = await createProject(formData)
      setProjects([...projects, project])
      setIsOpen(false)
    } catch (error) {
      console.error('Failed to create project:', error)
    }
  }

  return (
    <Dialog open={isOpen} onOpenChange={setIsOpen}>
      <DialogTrigger asChild>
        <Button variant="ghost" size="icon" className="h-5 w-5 text-sm">
          <PlusIcon />
        </Button>
      </DialogTrigger>
      <DialogContent>
        <DialogHeader>
          <DialogTitle>Create a new project</DialogTitle>
        </DialogHeader>
        <form ref={formRef} action={onSubmit} className="space-y-4">
          <Input type="text" name="name" placeholder="Project name" required />
          <div className="flex justify-end">
            <SubmitButton />
          </div>
        </form>
      </DialogContent>
    </Dialog>
  )
}
Finally, you’ll update the sidebar to query the list of projects and populate the store when the component renders. Update src/app/app/components/Sidebar.tsx to match the following:
'use client'

import { cn } from '@/lib/utils'
import { ChevronRightIcon, ChevronLeftIcon, InboxIcon } from 'lucide-react'
import Link from 'next/link'
import { UserButton } from '@clerk/nextjs'
import { useEffect, useState } from 'react'
import CreateProjectButton from './CreateProjectButton'
import ProjectLink from './ProjectLink'
import { useProjectStore } from '@/lib/store'
import { getProjects } from '../actions'

function Sidebar() {
  const [isCollapsed, setIsCollapsed] = useState(false)
  const { projects, setProjects } = useProjectStore()

  useEffect(() => {
    // Only fetch if we don't have projects yet
    if (projects.length === 0) {
      getProjects().then(setProjects)
    }
  }, [projects.length, setProjects])

  return (
    <div
      className={cn(
        'h-screen border-r border-gray-200 bg-gradient-to-b from-blue-50 via-purple-50/80 to-blue-50 p-4 dark:border-gray-800 dark:from-blue-950/20 dark:via-purple-950/20 dark:to-blue-950/20',
        'transition-all duration-300 ease-in-out',
        isCollapsed ? 'w-16' : 'w-64',
      )}
    >
      <nav className="space-y-2">
        <div className="flex items-center justify-between gap-2">
          <div
            className={cn(
              'transition-all duration-300',
              isCollapsed ? 'w-0 overflow-hidden' : 'w-auto',
            )}
          >
            <UserButton showName />
          </div>
          <button
            onClick={() => setIsCollapsed(!isCollapsed)}
            className="flex-shrink-0 rounded-lg p-1 transition-colors hover:bg-white/75 dark:hover:bg-gray-800/50"
          >
            {isCollapsed ? (
              <ChevronRightIcon className="h-4 w-4" />
            ) : (
              <ChevronLeftIcon className="h-4 w-4" />
            )}
          </button>
        </div>

        <div
          className={cn(
            'transition-all duration-300',
            isCollapsed ? 'w-0 overflow-hidden' : 'w-auto',
          )}
        >
          <Link
            href="/app"
            className="flex items-center gap-2 rounded-lg px-3 py-2 text-sm text-gray-700 transition-colors hover:bg-white/75 dark:text-gray-200 dark:hover:bg-gray-800/50"
          >
            <InboxIcon className="h-4 w-4" />
            <span>Inbox</span>
          </Link>
        </div>

        <div
          className={cn(
            'pt-4 transition-all duration-300',
            isCollapsed ? 'w-0 overflow-hidden' : 'w-auto',
          )}
        >
          <div className="flex items-center justify-between px-3 pb-2 text-xs font-semibold text-gray-500 dark:text-gray-400">
            <span>Projects</span>
            <CreateProjectButton />
          </div>
          {projects.map((project) => (
            <ProjectLink key={project.id} project={project} isCollapsed={isCollapsed} />
          ))}
        </div>
      </nav>
    </div>
  )
}

export default Sidebar
You can now add projects from the sidebar and add tasks to those projects.
Editing and deleting projects
Following the same design approach as earlier, we’ll now update the project page so that users can simply click the name of a project to edit it. We’ll also debounce the save so there is no need to manually click a save button. Because a Zustand store is being used, updating the name of the project in the store will automatically cause the new name to be displayed in the sidebar without having to refresh the page.
Start by appending the following server actions to src/app/app/actions.ts:
export async function updateProject(formData: FormData) {
  const { userId } = await auth()
  if (!userId) {
    throw new Error('Unauthorized')
  }

  const id = formData.get('id') as string
  const name = formData.get('name') as string

  if (!id || !name?.trim()) {
    throw new Error('Invalid input')
  }

  const project = await prisma.project.findUnique({
    where: {
      id,
      owner_id: userId,
    },
  })

  if (!project) {
    throw new Error('Project not found')
  }

  await prisma.project.update({
    where: { id },
    data: {
      name: name.trim(),
    },
  })

  revalidatePath('/app')
}

export async function deleteProject(projectId: string) {
  const { userId } = await auth()
  if (!userId) {
    throw new Error('Unauthorized')
  }

  const project = await prisma.project.findUnique({
    where: {
      id: projectId,
      owner_id: userId,
    },
  })

  if (!project) {
    throw new Error('Project not found')
  }

  // Delete all tasks associated with the project first
  await prisma.task.deleteMany({
    where: {
      project_id: projectId,
    },
  })

  // Then delete the project
  await prisma.project.delete({
    where: {
      id: projectId,
    },
  })
}
Since the project name is rendered in the <TaskList /> component, update src/app/app/components/TaskList.tsx to match the following:
'use client'

import TaskCard from './TaskCard'
import CreateTaskInput from './CreateTaskInput'
import { Task } from '@prisma/client'
import { useDebouncedCallback } from 'use-debounce'
import { Input } from '@/components/ui/input'
import { updateProject } from '../actions'
import { useRouter } from 'next/navigation'
import { cn } from '@/lib/utils'
import { useProjectStore } from '@/lib/store'
import { useEffect, useState } from 'react'

interface Props {
  title: string
  tasks: Task[]
  projectId?: string
}

export default function TaskList({ title, tasks, projectId }: Props) {
  const [editedTitle, setEditedTitle] = useState(title)
  const [isSubmitting, setIsSubmitting] = useState(false)
  const router = useRouter()
  const { updateProject: updateProjectInStore } = useProjectStore()

  useEffect(() => {
    setEditedTitle(title)
  }, [title])

  const debouncedUpdate = useDebouncedCallback(async (newTitle: string) => {
    if (!projectId || !newTitle.trim() || newTitle === title) return

    try {
      setIsSubmitting(true)
      const formData = new FormData()
      formData.append('id', projectId)
      formData.append('name', newTitle.trim())
      await updateProject(formData)
      // Update the store
      updateProjectInStore(projectId, { name: newTitle.trim() })
      router.refresh()
    } catch (error) {
      // If there's an error, reset to the original title
      setEditedTitle(title)
    } finally {
      setIsSubmitting(false)
    }
  }, 1000)

  return (
    <div className="flex h-screen w-full max-w-2xl flex-col gap-4 p-8">
      {projectId ? (
        <div className="group relative">
          <Input
            value={editedTitle}
            onChange={(e) => {
              setEditedTitle(e.target.value)
              debouncedUpdate(e.target.value)
            }}
            className={cn(
              'h-auto w-full p-1 text-lg font-semibold md:text-xl',
              'border-0 bg-transparent ring-0 focus-visible:ring-0 focus-visible:ring-offset-0',
              'placeholder:text-gray-500 dark:placeholder:text-gray-400',
              'hover:bg-gray-50 focus:bg-gray-50 dark:hover:bg-gray-800/50 dark:focus:bg-gray-800/50',
              '-ml-1 rounded px-1 shadow-none transition-colors',
            )}
            disabled={isSubmitting}
          />
          <div className="pointer-events-none absolute right-1 top-1/2 -translate-y-1/2 text-gray-400 opacity-0 transition-opacity group-hover:opacity-100">
            <svg
              xmlns="http://www.w3.org/2000/svg"
              width="14"
              height="14"
              viewBox="0 0 24 24"
              fill="none"
              stroke="currentColor"
              strokeWidth="2"
              strokeLinecap="round"
              strokeLinejoin="round"
            >
              <path d="M17 3a2.85 2.83 0 1 1 4 4L7.5 20.5 2 22l1.5-5.5Z" />
            </svg>
          </div>
        </div>
      ) : (
        <h1 className="text-lg font-semibold md:text-xl">{title}</h1>
      )}

      <div className="w-full flex-1 rounded-xl">
        <div className="space-y-2">
          {tasks.length === 0 ? (
            <p className="text-gray-500 dark:text-gray-400">No tasks</p>
          ) : (
            tasks.map((task) => <TaskCard key={task.id} task={task} projectName={title} />)
          )}
        </div>
      </div>
      <div className="w-full">
        <CreateTaskInput projectId={projectId} />
      </div>
    </div>
  )
}
To delete projects, we’ll use the same approach as we did with tasks by rendering a dropdown menu with an option to delete the project. Instead of in a modal though, we’ll add it to the <ProjectLink /> component so that when the user hovers over a project in the sidebar, the menu icon will be displayed as a clickable button.
Update src/app/app/components/ProjectLink.tsx to match the following code:
'use client'

import React from 'react'
import Link from 'next/link'
import { FolderIcon, MoreVertical, Trash2 } from 'lucide-react'
import { cn } from '@/lib/utils'
import { Project } from '../models'
import {
  DropdownMenu,
  DropdownMenuContent,
  DropdownMenuItem,
  DropdownMenuTrigger,
} from '@/components/ui/dropdown-menu'
import {
  AlertDialog,
  AlertDialogAction,
  AlertDialogCancel,
  AlertDialogContent,
  AlertDialogDescription,
  AlertDialogFooter,
  AlertDialogHeader,
  AlertDialogTitle,
} from '@/components/ui/alert-dialog'
import { deleteProject } from '../actions'
import { useProjectStore } from '@/lib/store'
import { useRouter } from 'next/navigation'

interface Props {
  project: Project
  isCollapsed?: boolean
}

export default function ProjectLink({ project, isCollapsed }: Props) {
  const [showDeleteDialog, setShowDeleteDialog] = React.useState(false)
  const [showMenu, setShowMenu] = React.useState(false)
  const { projects, setProjects } = useProjectStore()
  const router = useRouter()

  const handleDelete = async () => {
    try {
      await deleteProject(project.id)
      setProjects(projects.filter((p) => p.id !== project.id))
      router.push('/app')
    } catch (error) {
      console.error('Failed to delete project:', error)
    }
  }

  return (
    <div className="group relative">
      <div className="flex items-center rounded-lg px-3 py-2 text-sm text-gray-700 transition-colors group-hover:bg-white/75 dark:text-gray-200 dark:group-hover:bg-gray-800/50">
        <Link href={`/app/projects/${project.id}`} className="flex flex-1 items-center gap-2">
          <FolderIcon className="h-4 w-4 flex-shrink-0" />
          <span className={cn('transition-opacity duration-200', isCollapsed && 'opacity-0')}>
            {project.name}
          </span>
        </Link>

        {!isCollapsed && (
          <DropdownMenu open={showMenu} onOpenChange={setShowMenu}>
            <DropdownMenuTrigger
              className="ml-2 rounded p-1 opacity-0 transition-opacity focus:opacity-100 group-hover:opacity-100"
              onClick={(e) => e.preventDefault()}
            >
              <MoreVertical className="h-4 w-4 text-gray-500" />
            </DropdownMenuTrigger>
            <DropdownMenuContent align="end">
              <DropdownMenuItem
                className="text-red-600 dark:text-red-400"
                onClick={() => setShowDeleteDialog(true)}
              >
                <Trash2 className="mr-2 h-4 w-4" />
                Delete Project
              </DropdownMenuItem>
            </DropdownMenuContent>
          </DropdownMenu>
        )}

        <AlertDialog open={showDeleteDialog} onOpenChange={setShowDeleteDialog}>
          <AlertDialogContent>
            <AlertDialogHeader>
              <AlertDialogTitle>Delete Project</AlertDialogTitle>
              <AlertDialogDescription>
                Are you sure you want to delete "{project.name}"? This action cannot be undone and
                will delete all tasks associated with this project.
              </AlertDialogDescription>
            </AlertDialogHeader>
            <AlertDialogFooter>
              <AlertDialogCancel>Cancel</AlertDialogCancel>
              <AlertDialogAction
                onClick={handleDelete}
                className="bg-red-600 hover:bg-red-700 dark:bg-red-900 dark:hover:bg-red-800"
              >
                Delete
              </AlertDialogAction>
            </AlertDialogFooter>
          </AlertDialogContent>
        </AlertDialog>
      </div>
    </div>
  )
}
You can now update the names of projects and delete them as needed. Deleting a project will also delete any associated tasks with that project.
Conclusion
When building any application, security should always be something considered early on in the process. By considering the principles laid out in this article, you can build a secure system with ease using Clerk and properly structuring the code that accesses your database.
In the next article of the series, we’ll explore how you can securely access the data within your Neon database from the front end using Row Level Security using Clerk.
*Source: How Many Cyber Attacks Per Day: The Latest Stats and Impact in 2025
This article was first published in the Clerk blog.